Showing posts with label Indonesian. Show all posts

Wednesday, May 2, 2012

Sweet Chinese Steamed Bun

This afternoon I made some sweet Chinese steamed bun using the basic mantao recipe I have posted last time. This time I made it with some sweet fillings from mung bean paste mixed with sugar and coconut milk. There are some variety of the fillings, another kind is shredded coconut with palm sugar.
We call this kue KU, back home we enjoy this treats for morning or afternoon tea or coffee :)

I am so pleased with the result, the buns arise beautifully, tastes so good too, I hope the boys would enjoy their after school snack :)


Recipe for the bun you can find it HERE.

After the dough is ready, I did not fold the bun but instead I cut it evenly into 18 to 20 pieces.
(I thought I cut it into 18 pieces, but I just realized it now that I only have 17 pieces ...LOL)

For the filling :

1 cup uncooked peeled mung bean (soak it with water overnight)
3/4 cup sugar (you can adjusted to taste)
1/2 tsp salt
1/4 tsp vanilla extract
1/4 thick coconut milk or coconut cream

Method :

Drain the beans and steam it until cook, then let it cool.
Process the beans together with sugar and coconut milk, you can add or reduce the coconut milk until the bean comes to the right consistency, you do not want the paste to be too mushy or too dry.
Set aside, ready to use.

Take one peace of the dough, flatten it with your hand and scoop enough filling, then cover it neatly with the dough. Place it on the parchment paper.


Fill the steamer with warm water, lay all the ready bus and let it raise for 45 minutes to 1 hour.
Turn the stove on once all the bus are raising, cook until done.


Enjoy :)


Wednesday, November 9, 2011

K e l e p o n

I still have some leftovers of grated coconut from making PUTRI AYU the other day, and I do not like wasting :P so I decided to make some kelepon today for the boys to snack on after school.
I hope they'll like it ^__^


Kelepon is a traditional Indonesian snack made from glutenous rice flour filled with palm/arenga sugar, boil it, then rolled it into steamed grated coconut. It's really simple to make, I think almost every Indonesian know how.
Normally if the recipe calls from pandan flavor, I always use instant pandan paste, but this time I have canned pandan extracts handy, so I use that instead. And I could not be more happier with the result! I love love love the final color. The green is more natural and I love it!! ..... it really reminds me of home!!
Next time I'll use canned pandan extracts if I can, since I know in some recipes you have to stick with pandan paste.

K E L E P O N

INGREDIENTS :
200 ml pandan extract water (about 1/2 can)
1/2 tsp salt
1 tsp lime stone paste water (diluted a small amount of lime stone paste with 1 tsp lukewarm water)


250 gr glutenous rice flour
100 gr palm sugar/arenga sugar --> shredded (do not substitute with brown sugar)
250 gr grated coconut
1/2 tsp salt
Pandanus leaves (optional)

METHOD :

Mixed grated coconut with 1/2 of salt and pandanus leaves, then steam it until done, or you can put it in a microwave, covered and set on high for 1 minute. Set aside


In the mean time, heat the pandan extracts until warm (do not boil it), add 1/2 of salt and 1 tsp of lime stone paste. Mix it well, then add the glutinous rice flour into it. Use your hand mix it well and knead it until ready to be shaped.


Take a small amount of dough, flatten it, then put a little of palm sugar in the center.


Using your hand, shape the dough into like a small balls, about 2 cm of diameter.


Then boil it in a hot boiling water until done, about 5 minutes.


When it's done, roll the balls into prepared grated coconut.


Ready to serve ^__^


Enjoy it!!

Monday, November 7, 2011

Putri Ayu

Putri Ayu means beautiful princes, some people also call it putu ayu.
This sweet traditional Indonesian dish will always be my favorite. Back then when I was a kid I always loved when my mom took me to the traditional market, and she gave me some treats if I behaved, and putri ayu is the one I always picked along with carabikang (another Indonesian treats I haven't try to make my self yet).


PUTRI AYU

INGREDIENTS :


Toppings :
160 fresh grated coconut
1 tbsp corn starch
1/4 tsp salt

Cake batter :
5 eggs
200 gr sugar
200 gr all purpose flour
150 ml coconut milk
vanilla
1/4 tsp salt
1/4 tsp Pandan paste

METHOD :


  1. Mix together grated coconut milk, corn starch and sugar, then steam it until done for about 5 minutes, or you can put it in microwave and set on high for 1 minute covered.
  2. Prepare the molds and spray it with cooking oil such spam to avoid sticking, then put some prepared coconut about 1/3 or the mold or as you wish and pat it with finger tip.
  3. Mix together eggs and sugar and set the mixer in high speed, mix it until the egg becoming pale and the sugar is dissolved. Add in the coconut milk and pandan paste and mix it for a little while, then turn off the mixer.
  4. Mix together flour, salt and vanilla (I use the powder kind) and add it into the batter. Use spatula to stir and make sure there are no clumps in the batter.
  5. Pour the batter into the molds already has layer of prepared grated coconut.
  6. Steam it until done for about 15 minutes.

Mini Chicken Spring Rolls

As I mentioned on my previous post that I am planning to bring some Indonesian treats for Dylan's classmates, so today is the day ...
This morning I was so nervous because the treats I made are very time consuming, I prepared as much as I can a night before, but everything need to be fresh, so I did my best to prepare what I can and do the rests in the morning.
But thanks GOD everything went well today. Almost all the kids love the mini spring rolls and the other treats too. So I thought I should post the recipe here for future reference :P

But before I start with the recipe, let me share this tray of treats I brought to school :


The trims on the edges were supposed to be made out of banana leaves, but I can only get frozen banana leaves here so I thought I can replace it with some wrapping tissue, it ain't too bad huh? ...
Inside the tray are mini spring rolls, kue lumpur and putri ayu. Will post the recipe of putri ayu soon.


So here's the recipe for mini spring rolls :

MINI CHICKEN SPRING ROLLS

INGREDIENTS :
50 pcs small sizes spring roll skins (lumpia skins) sold at most Asian market at the frozen section
250 gr shredded carrot and cabbage
25 gr dried shrimp, soak it in a hot water then grind (optional) --> I substitute it with 1/2 tsp of fish sauce.
250 gr ground chicken
125 cc chicken broth or water
100 gr rice vermicelli,  soak it in hot water
2tbs vegetable or cooking oil and a lot more for final frying
1 egg
1/4 tsp white pepper
salt to taste
1 tsp sugar
3 cloves of garlic (finely chopped)
5 cloves of shallots (3 pcs if the sizes are big, or 1 whole regular onion) finely chopped

METHOD :
Heat 2 tbsp of cooking oil and saute garlic and onion until fragrant. Add ground chicken and dried shrimp, keep stirring to make sure the chicken is not clumpy.
Add shredded carrot and cabbage and keep stirring
Pour in the chicken broth and the rest of seasonings. Let it boil then add the vermicelli, stir again.
Lastly add the egg and make sure everything is well mixed and no more liquid. Remove from heat, set aside and let it cool.
Prepare one sheet of the spring roll skin, spoon a small amount of filling mixture in the center then fold it like an envelope, seal the edges with egg white.
Deep fry until golden brown, ready to serve with your favorite dipping sauce.

    Saturday, November 5, 2011

    Kue Lumpur

    It's been a long while since my last post. But I wont bore you with some excuses ... LOL

    Okay, tomorrow is Dylan's birthday and I'd love to bring some Indonesian sweet treats to his class on Monday, so today I need to practice some recipes. And I choose KUE LUMPUR among hundreds of yummy Indonesian sweet treats simply because it's my favorite, it's not too sweet and I just love its texture. I hope the kids will love it too...*I am crossing my fingers*


    KUE LUMPUR literary means mud cake, but don't get confuse or mixed up with American mud cake. It's totally different.
    Kue lumpur has a texture similar to pancake, tastes like in between pancake and custard with a hint of coconut flavor plus raisins. You can choose raisins for the topping, young coconut flesh or any of your favorite sweet toppings.


    KUE LUMPUR
    Indonesian mud cake

    INGREDIENTS :
    75 gr margarine
    250 ml light coconut milk + 500 ml thick coconut milk *
    175 gr all purpose flour
    125 gr sugar
    1/2 tsp salt
    1 tsp vanilla
    5 egg + 1 yolk (whisked)
    Raisins for toppings

    * since I used 400 ml canned coconut milk, what I did was taking 100ml of the coconut milk and diluted it with 150 water. And I added 200ml of water and mixed it to the remaining 300ml so that would make 500ml.

    METHOD :
    1. Heat the margarine and 250 ml light coconut milk and sugar until margarine melted and boiled, add salt and vanilla. Then add shifted flour and quickly mix with wooden spatula until it gets really well mixed.

    2. Turn the stove off and remove from the heat. Gradually add some egg and 500 ml coconut milk and keep stirring until well blended and the texture is smooth and silky. I strained the mixture using a very fine strainer to make sure there are no clumps.

    3. Heat the pan on top of the stove and brush it off with some margarine to avoid sticking. Pour the mixture for about 3/4 of each cup, cover and let it cook halfway. Add some raisins then cover it again and cook it until done.


    4. Using a small heat proof spatula gently remove kue lumpur from the pan and ready to serve, it's good with cup a tea for morning or early evening snack.

    Thursday, September 15, 2011

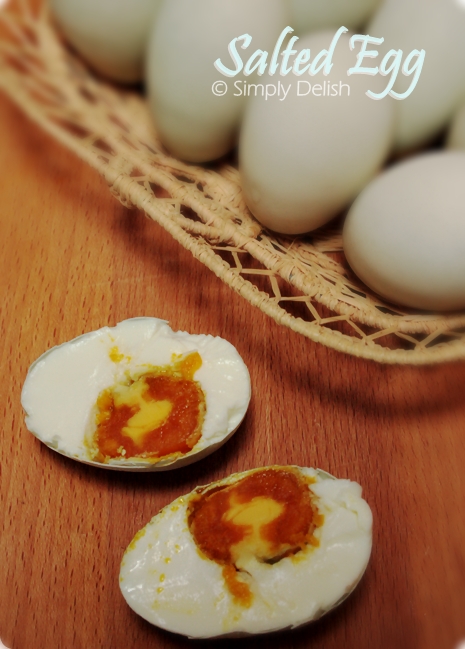
    Salted Egg

    Still about egg!! this time is Salted Egg. I made this long time ago but never had a chance to post it here.


    I often craving for salted egg especially when I made some Rawon (Indonesian style beef stew), but the salted  egg I got from Asian grocery is so much different from Indonesian one, I do not like the taste and its texture, it's way way too salty for me.
    Commonly salted egg is made using duck egg, but since I do not have duck eggs here I used chicken egg instead. I raised some chicken at the back yard and I was so excited when I found out one of the chicken is giving me a light blue egg, just exactly the same color with duck egg's shell.

    To make salted egg, normally we use some kind a sand mixed with lots and lots of salt. Then we cover the egg and let it sit for days up to a week or so, after that then it can be harvested.
    The most commons way to cook it is to boil it, but I you can also mix it with nasi goreng or even some other dishes just to give an extra savory and salt flavors.

    Since I do not have and do not dare to use any available sands here, I use water instead. Actually I knew this technique from a good friend of mine, at first I was kind a reluctant to try, but I did it anyway. The result was so good and I honestly think the taste is so much better compared to the one I got from Asian Market.

    SALTED EGG (Telur Asin)
    1 dozen of chicken egg (preferably duck eggs)
    2 cups of salt (or more)
    2 litters of water

    Method : 
    Mix the water with salt until dissolve, soak the eggs and make sure the water covers it. Use a small plate or any other object and put on top of the eggs so it can be covered by salted water. Put aside for up to 1 week (I some times do more than that). Do not worry the salt will protect the eggs from getting rotten.
    After 1 week try to boil one of the eggs, if you satisfied with the saltiness you can harvest it all, if you think it is not salted enough then let it sit in the salted water for another week until ready to be harvested.

    Marbled Egg

    Marbled egg is called Pindang Telor by Indonesian, if I am not mistaken, I think this is one of the Chinese influenced dish enjoys by many Indonesian. The Chinese version however is quite different because they are using a completely different spice and herbs. The only similarity is its cooking technique.
    This kind of egg is very commons to cook on a special occasions or celebrations as a side dish. Back home my mom still making this if they have something to celebrate or we call it SYUKURAN (a special occasion of thanking God for all His Blessing by inviting people to enjoy some traditional dishes). And afterward they usually going home with a box of rice and so many side dishes, and this kind of egg is one of them.


    Traditionally to cook this egg you'd need lots of red onion's skins and guava leaves to add some unique colors. But since I am lack of the guava leaves I am using teabag instead, works great!!
    I enjoy this egg with some rice porridge or some Nasi Uduk (Indonesian Fragrant Rice).

    MARBLED EGG (Pindang Telor)

    1 dozen of eggs (or more)
    Red onion's skins (as much as you have)
    5 cloves of unpeeled garlic (whacked)
    1 bay leaf
    2 big slices of galanga
    1 teaspoon turmeric powder

    Method :

    Boil the eggs with all of the other ingredients until the egg is cooked, turn the heat off, set aside and let it cool. Crack the egg shells but do not peel it, just enough so the juice can get trough and give its marbled pattern and color.
    Reboil for another hour or so until the colors turned much darker. Set aside and let it cool, ready to serve.

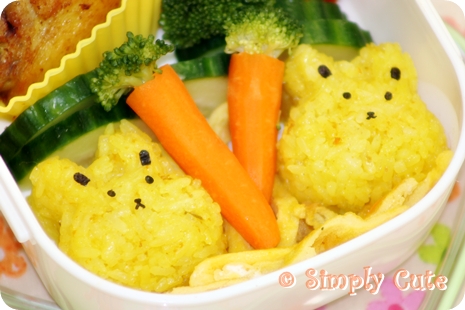
    I also put this egg in my son's bento, you can check it out here.

    Tuesday, June 21, 2011

    Lemper Ayam


    I am craving for this authentic Indonesian snack after reading a comment from an American student who came to Indonesia and becoming obsessed with this food call LEMPER AYAM. She also love mata kebo, but I already put the recipe of mata kebo HERE, I know it still in Bahasa Indonesia, maybe one day if I decided to make it again I'll post it in English with a better picture :P (Will see!)

    Traditionally, Lemper Ayam is wrapped in banana leaves, the shape is round with some chicken fillings inside.  But since I live in the country where banana leaves only come frozen, somewhat prissy and a bit inconvenience (for me :D) so I choose to use wax paper instead :D
    To save some time and process, I did not shape the lemper one by one with hands, instead I layered the rice and chicken and another rice, as you can see on the pictures.


    LEMPER AYAM
    Indonesian glutinous rice with aromatic chicken filling

    Ingredients :
    500 gr glutinous rice (soak it for at least 2 hours, I did it overnight)
    500 ml coconut milk
    2 Indian bay leaves
    2 Kefir lime leaves
    1 Pandanus leaf
    1 stalk lemon grass (bruised)
    1 tsp salt (or to taste)

    Chicken filling :
    350 gr chicken breast (boiled until cooked, then shredded)
    2 Indian bay leaves
    4 Kefir lime leaves
    200 ml coconut milk
    1 tbsp Javanese tamarind's juice
    1 1/2 tbsp sugar
    3 tbsp cooking oil

    Grind into paste :
    9 shallots (I used 1 big size of onion)
    5 cloves of garlic
    1 1/2 tbsp coriander powder
    5 pcs roasted candle nut
    1/2 tsp cumin
    1 inch galanga
    Salt and pepper to taste

    Method :
    1. Drain the rice, then steam it for 15 to 20 minutes, remove from heat, set aside.
    2. Heat the coconut milk together with lemon grass, bay leaves, kefir lime leaves, pandanus leaves and salt until it simmers.
    3. Add the rice into simmering coconut milk, stir and let it cook until done. Watch this process carefully, fold the rice to make sure you do not overcook the bottom part, but at the same time you do not want to over do it, you do not wanna ended up having one big clumpy sticky rice ball :). Remove from heat, discharge all the leafy herbs/seasoning and divided into 2 parts, set aside.
    4. Heat the cooking oil in a large pan, saute the seasoning paste until fragrant. Add the shredded chicken and the rest of the ingredients. Stir until everything is well blended and no more liquid. Remove from heat and set aside.
    5. Prepare a non stick square or rectangular baking pan such as pyrex, then layer one part of the rice and gently spread it all over the pan. Then add the chicken filling and spread it on top of the first layer. Last add the other part of the rice and spread it all over using spatula.
    6. Steam until it's cooked. Remove from the heat and let it cool.
    7. Release it from the pan, slice it as desire then wrap it with wax paper. Enjoy it!!

    Wednesday, June 15, 2011

    Risoles Ayam


    Risoles Ayam is a very popular Indonesian snack or appetizer, some people enjoy it for brunch. The concept is similar to spring rolls but taste completely different. The wrapper uses for risoles has to be home-made. You can't subtituded it with a store-bought lumpia wrappers otherwise it will be called lumpia goreng.
    It took whole day to make everything from scratch but it really was worth it, my whole family loves it! I packed some for my kid's bento the other day, you can check it HERE.

    RISOLES AYAM

    Skin/wrappers :
    200 gr all purpose flour
    1 tbsp corn starch
    500 ml milk (fat free or 2%) --> you can use 150 ml of evaporated milk mixed with 350ml water.
    4 eggs
    1 tsp salt
    75 gr melted margarine 

    Filling :
    100 gr ground chicken
    150 gr carrots (julienne or diced) 
    100 gr green bean (cut into small pieces)
    2 stalks celery finely chopped/diced
    4 cloves of shallots or 1 big onion, finely chopped.
    2 cloves garlic, minced.
    ¾ tsp salt 
    ½ tsp black pepper
    ¼ tsp sugar
    ¼ tsp nutmeg
    1/2 cup milk (chicken broth is optional)

    1/4 cup all purpose flour
    3 tbsp cooking oil (I use margarine)


    Egg wash :
    2 eggs mixed with 1.4 cup of milk
    150 gr bread crumbs

    Method :

    1. For fillings : Heat the cooking oil/margarine in a large pan then saute garlic and onion until fragrant, add ground chicken and stir until the chicken turns white. Add carrots, green beans, and celery then keep stirring for about 5 minutes. Add salt, black pepper, sugar and stir until all blended. Add milk/broth, keep stirring until bubbling, then add some flour. Keep stirring until the mixture is thickened. Remove from the heat and set aside.

    2. For the wrappers : Mix well all the ingredients, I like to do this ahead of time to make sure everything is well blended and set. You can use regular whisk or electric mixer but make sure there are no lumps in the batter, if there are some then you need to strain it.
    Prepare a non stick pan, I use a small one like smaller than 8" so the final size of the risoles wont be too big. 
    Brush the pan lightly with margarine, set the stove on medium low. Ladle the batter into a pan and kind a gently swirl the pan in a circle motion to make sure the batter is evenly covered the surface. This step is important to produce a nice thin skin that is gonna be easy to work with. 
    Let it cook for about 1-2 minutes, just check at the surface if the batter is all evaporated then it should be done, at this point release the edge of the skin using spatula, then gently remove it from the pan. You do not need to cook the skin on both sides. Repeat the same process for the rest of the batter. 


    3. Spoon a little bit of the filling in the upper center of the wrapper, fold the wrapper from the top then the left and right side like you do an envelope, then gently press it and roll it down.


    4. Put the risoles inside the egg wash, then roll it onto some breadcrumbs, make sure all the sides are coated with breadcrumbs. And ready to fry.


    5. Deep fry the risoles until golden brown and cooked, then let it sit on a paper towel. 


    5. Ready to serve with your favorite chili dipping sauce. I personally enjoy it with raw Thai bird chili.


    NOTE :
    1. I did the step 2 and step 3 at once, I found this way to be very effective for me. So when one wrapper is done, I ladle the batter for the next one and let it cooked in low heat stove. In the mean time I do step 3. I always think if I stack the wrappers when it's still hot it will be all sticking together. But you have to be sure you are confidence with your speed, if you choose to make the whole wrappers at one time then you should put parchment paper in between the layers to avoid sticking.     


    2. You can also use this below filling option for more variety flavors :

    Cheese and smoked beef :
    200 gr smoked beef, thin sliced.
    4 hard boiled egg, quartered or cut into 6 pieces.
    150 gr shredded cheese.


    Sunday, May 22, 2011

    Turmeric root and kaempferia galanga fried rice

    I made this Saturday morning and seeing the boys and hubby really really love its taste I decided to make it again the next day. I even made some bento for my boys, you can see it HERE. Too bad I did not had a chance to take any picture so I am using one of my bento pictures. But I'll update it when I make it again.


    We call this fried rice a Nasi Goreng Kunyit, it's translated as turmeric fried rice.
    My mom made this a lot when we were little, especially when one of us complain about having stomachache. Back then I did not know any details about good benefits of turmeric roots etc, I just know its good for you, and I love its taste too.

    NASI GORENG KUNYIT DAN KENCUR
    Turmeric and Kaempfria galanga fried rice

    Ingredients :
    3 cups cooked jasmine rice (preferably leftovers from the previous day)
    If you use fresh cooked rice, let it cool completely then storage in the fridge for couple hours.
    2 tbsp cooking oil

    Grind into paste :
    1 inch fresh turmeric root
    1 inch fresh kampferia galanga
    3 cloves of garlic
    Salt and pepper (as desire)
    (if you like spicy hot, you can add fresh Thai bird chili at this point)

    Method :
    Heat the cooking oil and when it's ready add the seasoning paste in and cook until fragrant. Add the cooked rice and stirring until all the rice becoming yellow. Keep stirring until done. Ready to serve with some omelet or sunny side egg with sliced of fresh cucumber.

    Monday, May 16, 2011

    Centik Manis

    I decided to make this yesterday afternoon because it was raining all day long, the boys were so bored and so was I. Didn't feel like spring at all here in Bellingham and sometimes I wonder if summer will ever come.

    Centik Manis is one of my favorite traditional Indonesian snack. I do not know exactly who came up with such name, but CENTIK means pretty and little, while MANIS means sweet. So centik manis is translated as  Indonesian pretty and sweet snack, even though its taste is not as sweet compared to most American dessert.  It tastes similar to rice pudding or tapioca pearl pudding. But has firmer texture.

    I love when my mom brought some from the traditional market nearby our house. Making this is really brings back my childhood memories.
    Traditionally centik manis is wrapped in a plastic or banana leaves, but since I am too lazy I thought using pudding mold or jello mold is more practical and can still be pretty. This time I used putri ayu molds. If you lack of such molds you can simply pour the mixture in a 8X8 pan to be sliced afterward.


    Centik Manis

    Ingredients :

    50 gr multi color tapioca pearl
    75 gr mung beans starch (tepung hunkue)
    100 gr sugar
    800 ml coconut milk (I used 1 can (400ml) of coconut milk and added 400ml more water)
    1/4 teaspoon of salt
    Vanilla extract (I use vanilla bean, 1 bean goes along way)
    pandan leaf (sold at most asian market fresh and frozen)

    Method :
    • Boil the tapioca pearl until done, drained and set aside
    • Mixed the rest of ingredients in a 2 quart pot and turn the heat on medium low
    • Keep stirring until the mixture got thickened
    • Add the cooked tapioca pearls  
    • Stir again and make sure everything is mixed and cooked 
    • ladle the mixture into molds
    • let it cool and well set
    • release it from the molds and ready to serve


    Tuesday, April 26, 2011

    Gangan Waluh Habang


    Ingredients:
    1 bh (300gr) labu kuning
    1 kl santan
    1 kl jagung manis
    100 gr kacang panjang, bersihkan, potong2 4 cm
    100 gr bayam, petiki daunnya
    minyak untuk menumis bumbu.

    Bumbu:
    8 siung bawang merah, iris tipis
    4 siung bawang putih, iris tipis
    2 cm lengkuas. memarkan
    1 sdt merica bubuk
    2 sdt garam
    2 sdt gula pasir

    Directions:
    Kupas labu kuning dan sisakan sedikit bagian kulitnya yg tebal, buang biji, potong dadu 2 cm.
    Rebus labu kuning dengan santan encer, hingga setengah matang.
    Tumis bawang merah dan bawang putih hingga wangi.
    Masukan bumbu yg ditumis kedalam sayur, aduk rata, didihkan kembali, tambahkan santan kental, aduk rata.
    Masukan kacang panjang, tunggu sampe kacang panjangnya empuk, terakhir masukan bayam dan jagung kaleng. Angkat, sajikan.

    Sambal goreng udang & kentang


    Ingredients:

    Udang, kupas goreng
    2 ato 3 buah kentang, kupas potong dadu goreng
    3 tomat ukuran sedang, potong kotak sedang
    15 cabe merah ( haluskan ) atau sambel oelek (4 atau 5 sdk makan)
    5 bwng merah, iris tipis
    Kaldu blok (bila suka)
    5 lembar daun jeruk
    cuka sedikit


    Directions:
    Tumis bawang merah sampai kuning,masukkan irisan tomat lalu masukkan cabe dan udang goreng dan kentang gorengnya, kemudian daun jeruk dan kaldu blok...aduk sampai bumbu cabe mengental dan tomat lembek. Tambahkan gula pasir dan garam sesuai selera...
    Hati2 bila menambahkan garam, karena kaldu daging sudah bergaram.
    Masukkan kentang goreng dan aduk rata.
    Hmhmhm...nikmat dimakan sama nasi anget-anget!

    Monday, April 25, 2011

    Soto Ayam (Indonesian style fragrant chicken soup)


    I make this soup many times for SOUPY FRIDAY at my boys's school, Soupy Friday is a fund raising program where parents can come and enjoy a  $1.00/bowl of soup with their kids.
    At first I was reluctant to make it, but one day I did it and almost everybody love it!! even the picky eater kids love its taste. 


    Soto means soup in Indonesian while ayam means chicken. There are so many version of this particular soto ayam, but in general it's almost similar, some regions use different garnish compared to another regions.

    I however adjusted some garnishes to be well excepted by my family and friends here. But still maintain its taste to the original by using as much as possible fresh spices and herbs. It is pretty hard to get some fresh galangal, turmeric roots etc. But I am so grateful to live in a city where I can get almost everything. 

    Tuesday, April 19, 2011

    Semi home-made roti isi daging


    I was reluctant about posting this in my blog, since it is not really a recipe. But then I thought it might be useful for my sisters at home and my friends.

    I made some beef croquettes last week and have plenty of beef filling leftovers, then I remembered I bought some frozen bread dough a while ago. A HA!! beef and veggie filled bread baby!!! yeah ... 
    This kind of bread is always remind me of my childhood, remind me of my family and home. The fillings are varied, from sweet to savory, from beef, chicken, vegetables to milk, cheese, jam etc. 
    It's quite popular among Indonesians. My mom used to buy us just for branch or to snack on between lunch and dinner. 

    So here we go ... semi-home made beef and vegetables fillings bread or I call it Roti Isi Daging


    Thursday, October 28, 2010

    Sayur Bobor Daun Singkong


    Ingredients:
    Ikan teri, goreng garing, sisihkan
    Daun singkong, rebus, peras airnya, potong2 asal ajah.
    Santan

    Bumbu :
    2 cm lengkuas, memarkan
    2 lbr daun salam
    1 sdt gula pasir
    1 sdt garam halus

    Bumbu yg dihaluskan :
    5 siung bawang merah
    3 siung bawang putih
    1 cm kencur
    1 sdt ketumbar

    Directions:
    Tumis bumbu halus sampe wangi, masukan bumbu2 yg lainnya, masukan santan dan aduk sesekali sampe mendidih.

    Masukan daun singkong yg sudah dipotong2, aduk lagi perlahan.
    Sesaat sebelum diangkat masukan goreng ikan teri-nya. Siap dihidangkan.


    Wednesday, October 27, 2010

    Tumis Pare


    Ingredients:

    Paria, potong2
    Daging cincang sedikit aja (optional)
    Cabe ijo (harus, kalo nggak adapun hrs diganti cabe rawit) dipotong serong
    Bawang merah (aku pake bawang bombay) dirajang kasar
    Bawang putih, iris halus
    Merica, gula putih dan garem
    Kaldu block (kalo suka)
    Tomat (kalo suka aja)
    Minyak goreng untuk menumis


    Directions:
    Tumis bawang putih dan bawang bombay sampe layu, masukin daging cincang aduk rata, lalu masukin paria dan cabe ijo-nya, aduk lagi, terakhir masukin gula putih, merica dan garem, dan irisan tomat. Aduk2 lagi dan angkat kalo sudah mateng.

    Sayur Cabe Ijo


    Ingredients:

    Cabe ijo/jalapeno (sesuai selera) dipotong memanjang tapi jangan sampe putus.

    1 potong lengkuas

    2 lembar daun salam
    2 sdm kecap manis


    Bumbu yang dihaluskan :

    4 siung bawang merah (aku pake bawang bombay 1/4 potong)

    4 ato 5 siung bawang putih 
    5 butir kemiri
    3/4 sdt ketumbar
    garem dan merica secukupnya
    Santan ato susu sedikit aja (optional biar kuah lebih berasa)
    minyak goreng untuk menumis


    Directions:

    Tumis bumbu yang dihaluskan sampe wangi ... lalu masukan cabe ijo-nya ... aduk perlahan ... terakhir masukan daun salam dan lengkuas .. lalu kasih air sedikit aja ... terus kasih kecap :):) angkat klo udah mateng.


    Note:

    Kalo gak mau terlalu pedes bisa dicampur buncis, tahu, tempe, telor rebus .. apa aja dech .. asal cabe ijo harus ada :):):)

    Semprit Sagu Keju


    Ingredients:
    125 g margarin
    100 g mentega tawar (butter)
    125 g gula bubuk
    3 kuning telur ayam
    100 g keju Edam parut
    50 g keju Cheddar parut (aku ganti pake gouda cheese)
    300 g tepung sagu (aku pake maizena)
    50 g tepung maizena
    50 g tepung terigu 

    Directions:
    Kocok margarin, mentega dan gula hingga lembut.
    Tambahkan telur satu per satu sambil kocok rata.
    Masukkan keju, aduk dengan sendok kayu hingga rata.
    Tambahkan tepung sagu, maizena, dan terigu. Aduk hingga rata.
    Masukkan adonan ke dalam kantong smeprotan kue. Beri semprotan mawar besar atau yang lain. Adonan sedikit liat karena itu pilih semprotan yang agak besar.
    Semprotkan ke atas loyang datar bersemir mentega.
    Panggang dalam oven panas 170 C selama 30 menit hingga kuning dan kering.

    Angkat dan dinginkan. 
    Untuk 900 gram

    Sayur Lodeh Expressss...


    Ingredients:

    Nangka kaleng

    Kacang panjang
    Kol
    Labu siam
    Tahu (karena D&B suka banget tahu dilodeh)
    Cabe ijo (aku liwat karena bwt anak2)

    Bumbu :

    Bawang goreng merah siap pakai
    Bawang putih goreng siap pakai
    Lengkuas kering
    Daun salam kering
    Garem dan merica
    Gula putih
    Santan kaleng

    Directions:

    Rebus sayuran yang lama matengnya dengan sedikit air, tambahkan santan dan semua bumbu, masak lagi .. lalu masukan sayuran yang cepet mateng-nya. Masak lagi sampe mateng :) siap dihidangkan.
    Simplydelish.blogspot.com. Powered by Blogger.

    "Being a full-time mother is one of the highest salaried jobs in my field, since the payment is pure LOVE" ~ MILDRED B. VERMONT ~

    Related Posts Plugin for WordPress, Blogger...